Managing Time Entries
Time Entry
is located under Time-->Standard Time Entry (see figure 29.1).
Time Entry
allows you to input the hours that you worked on a single timesheet. You can view
your time for a single day or an entire period. Time Entry displays the period
view by default. To enter time for a period, go to Viewing by Period. To enter
time or view hours for a different period, you can use the Calendar in the login bar in the upper right corner to jump to a particular date. Alternatively, you may use the Date Arrow Icons
( ) to move
backward or forward one period at a time. To enter time for a single day, go to
Viewing by Day. To enter time or view hours for a different day, you can use
the Calendar in the login bar in the upper right corner to jump to a particular date. Alternatively, you may
use the Date Arrow Icons to move backward or forward one day at a time.
) to move
backward or forward one period at a time. To enter time for a single day, go to
Viewing by Day. To enter time or view hours for a different day, you can use
the Calendar in the login bar in the upper right corner to jump to a particular date. Alternatively, you may
use the Date Arrow Icons to move backward or forward one day at a time.
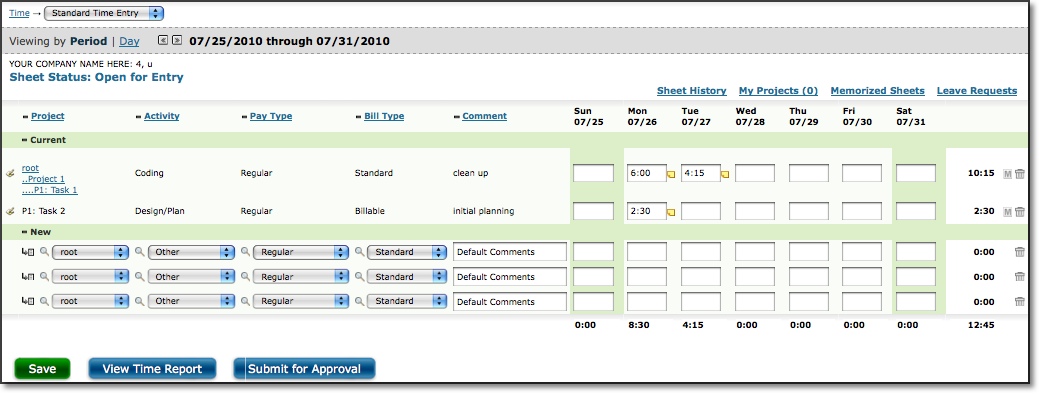
Figure 29.1. Time Entry
Keep in mind
that timesheets are configured by administrators so your timesheet may vary in
appearance and functionality from the one shown. The system allows your organization
to customize the names of items used for time tracking. For example, certain column
headers in your timesheet such as Project, Activity, Pay Type, and Bill Type may be
hidden or may have been renamed altogether.
Users are able to enter time
as discreet units of time that are associated with individual Projects, Activities,
Pay Types and Bill Types. Additionally, each of these time entries may also have
a text comment associated with it to further specify the nature of the hours logged.
The default timesheet is shown below. This section of the manual will refer
to items as they are seen on this particular timesheet. Again, your timesheet
may differ slightly. However, it should behave exactly as described here, even
if the names have been changed or certain columns are not visible.
Your
administrator has already set up your timesheet to let you log hours worked during
a particular period or date range. Timesheet periods are typically a week, month,
or pay period, depending on how your company prefers to track the time that you
spend on projects. To enter time or view hours for a different period, you can
use the Calendar in the login bar in the upper right corner to jump to a particular date. Alternatively, you
may use the Date Arrow Icons ()
at the top of the timesheet to move backward or forward one period at a time.
Standard
timesheets will typically let you select a Project, Activity, Pay Type, and Bill Type.
To create a time entry, select a value from each of the dropdowns shown on your
timesheet. You may also be required to specify a Comment for the time entry, depending
on what your administrator has set up for your timesheet. Once everything has
been selected, you need to specify the hours worked for that project on a specific
date. Assuming your administrator has not limited entry to a single format, your
timesheet will accept hour entries in both standard HH:MM (2:35) format as well
as in decimal format (1.25 = 1:15). If you enter hours in decimal format, it will
convert your entry to HH:MM, rounding to the nearest whole minute. Values 0.5
and higher will be rounded up; values 0.49 and lower will be rounded down. Therefore,
if you enter 1.13, the system will convert this to 1:08 (1.13 hours = 1 hour and
7.8 minutes, rounded up to 1 hour and 8 minutes).
Depending on the timesheet
settings set up by the administrator, you may also be able to enter your time
as a percentage of the work day. The total hours in a workday will also be defined
by your system administrator. So if the workday is defined as 8 hours per day
and you worked 4 hours, you would simply specify 50 for having worked 50% for
that workday.
Once you have selected the appropriate items and entered your hours for that combination,
click the Save button at the bottom of the time entry grid. The timesheet will refresh and your
entries will now appear in the Current section. In some cases, your Journyx Administrator may
have configured the system so that existing entries are locked. In this case, you can not simply
change the amount for an existing entry. Instead, click on the link for the time amount, make the
necessary change, and specify the reason for the change. If the sheet is not locked, you may add
hours to this entry in the same day simply by changing the amount. In either case, you can always
add hours to another day in the time period that is currently displayed.
You may create more than one time record at a time. Simply create the actual time entries for
different days and/or different combinations of items and then click the Save button at the bottom
of the timesheet. The timesheet will refresh and your entries will now appear in the Current section.
To edit a time entry on your timesheet, click the Edit Icon ( )
to the left of the respective entry. (Note that for locked sheets, the edit icon
will not be available.) This will refresh the screen and allow you
to change the Project, Activity, Pay Type, and Bill Type. You can also modify your
Comment associated with the entry.
)
to the left of the respective entry. (Note that for locked sheets, the edit icon
will not be available.) This will refresh the screen and allow you
to change the Project, Activity, Pay Type, and Bill Type. You can also modify your
Comment associated with the entry.
To delete a time entry from your timesheet,
you can click the Delete Icon ( ),
a trash can, to the right of the respective time entry. The screen will refresh
with the time entry having been removed.
),
a trash can, to the right of the respective time entry. The screen will refresh
with the time entry having been removed.
Searching For and Selecting a Project
There are four ways to select
a project when managing time entries. You can use the expandable Project Tree,
the Inline Tree in the Project dropdown, Project Search, or the My Projects List.
Project Tree
The first method allows you to select a project from a
hierarchical tree that contains all the projects to which you have been granted
access, as well as some of the parent projects that are required for drilling
down into the hierarchy. To view the tree, click the Project Tree Icon ( ),
an arrow with a list, located to the left of the respective Project dropdown.
This will launch a pop-up window containing a navigable project tree with expanding
and collapsing nodes (see figure 29.2). To open a node and view all child projects,
click the expand node. To close a node and hide all child projects, click the
collapse node. When you have found the project that you wish to log time to, select
the project and then click the Done button. This will close the pop-up window
and the project you selected should appear in the Project dropdown.
),
an arrow with a list, located to the left of the respective Project dropdown.
This will launch a pop-up window containing a navigable project tree with expanding
and collapsing nodes (see figure 29.2). To open a node and view all child projects,
click the expand node. To close a node and hide all child projects, click the
collapse node. When you have found the project that you wish to log time to, select
the project and then click the Done button. This will close the pop-up window
and the project you selected should appear in the Project dropdown.
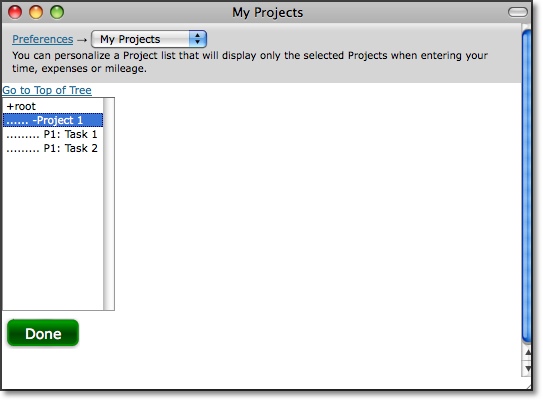
Figure 29.2. Project tree
Inline Tree
in Dropdown
The second method allows you to drill down into the project
hierarchy using a project tree that is included in the project dropdown itself.
If your administrator has set up your timesheet to include this option, you can
navigate down through the hierarchy of projects by clicking on selections directly
in the Project dropdown. After each selection, the next level in the hierarchy
is displayed. The final selection that is made prior to save determines the project
to which time will be logged.
Project Search
The third method allows
you to specify search criteria and select a project from the search results. To
do a project search, click the Project Search Icon ( ),
the magnifying glass, located to the left of the respective Project dropdown.
This will launch a pop-up window containing search criteria (see figure 29.3).
Specify the project name or description for the project that you are searching
for. As you type, you will see returned search results below the search criteria.
From the search results, you can select the project that you wish to log hours
for. When you select the project, the pop-up window will automatically close and
the project you selected should appear in the Project dropdown menu. Additional
search options can be selected by clicking on the arrow to expand the Search Options
table.
),
the magnifying glass, located to the left of the respective Project dropdown.
This will launch a pop-up window containing search criteria (see figure 29.3).
Specify the project name or description for the project that you are searching
for. As you type, you will see returned search results below the search criteria.
From the search results, you can select the project that you wish to log hours
for. When you select the project, the pop-up window will automatically close and
the project you selected should appear in the Project dropdown menu. Additional
search options can be selected by clicking on the arrow to expand the Search Options
table.
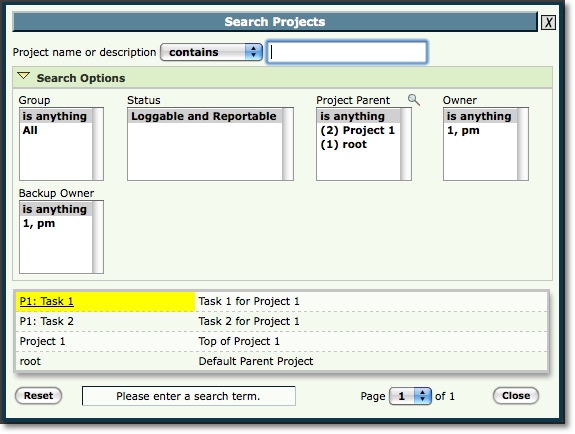
Figure 29.3. Project search
My Project
List
You can maintain your own unique list of projects that will be displayed
by default in the project dropdown. This will keep you from having to routinely
search for or select a project from the project tree for projects that you frequently
log hours to. The My Projects link, located at the bottom of the timesheet will
launch a pop-up window that can be used to add and remove projects from your unique
Project List (see figure 29.4). You may add projects from the Available Projects
list by selecting the project and clicking the Add button. These projects will
be added to your Project List shown in the box to the right. To remove a project
from your Project List, select the project and click the Remove button. You also
have the ability to add and remove all projects to and from your Project List.
When you are finished, click the Save button.
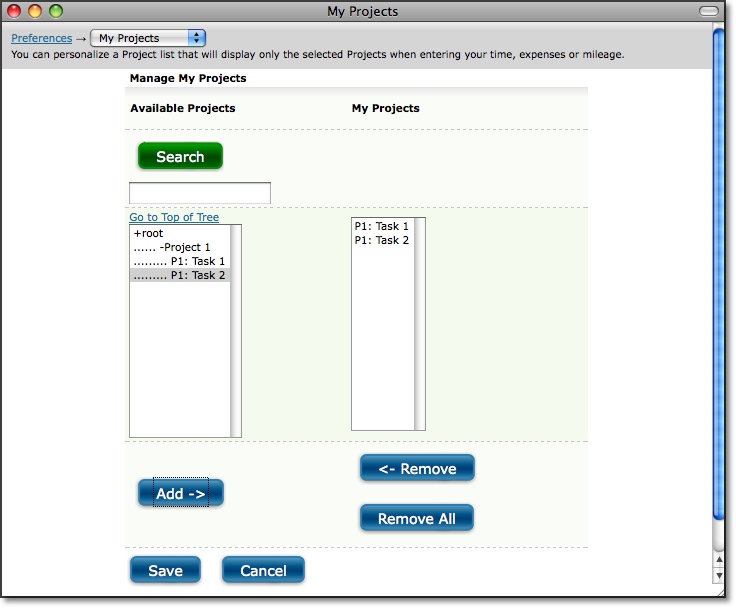
Figure 29.4. My Projects
Memorized Entries
Memorized Entries allow you to save your most common
tasks so that you do not have to repeatedly select them when entering time. A
Memorized Entry contains a single Project, Activity, Pay Type, Bill Type, and Comment.
After an entry has been memorized, it will appear in all your timesheets thereafter.
You then only need to specify the hours, if any, for that task.
To create
a Memorized Entry, select the appropriate Project, Activity, Pay Type, Bill Type,
and Comment, and then click the Save button. You can only create a Memorized Entry
after that entry has been saved in your timesheet. After the entry has been saved,
you will see the Memorize Icon ( ),
an embossed M, to the right of the entry. Click the Memorize Entry Icon, review
the contents of the entry as it is displayed on the User Memorized Entries screen,
and click Save to preserve the entry. The information in that entry will be memorized,
except the hours, and will appear in all your timesheets thereafter. You can also
memorize part of an entry by using the wildcards feature. Selecting the 'any'
value from the appropriate dropdown will not memorize that field. The same is
true when leaving the Comment field blank.
),
an embossed M, to the right of the entry. Click the Memorize Entry Icon, review
the contents of the entry as it is displayed on the User Memorized Entries screen,
and click Save to preserve the entry. The information in that entry will be memorized,
except the hours, and will appear in all your timesheets thereafter. You can also
memorize part of an entry by using the wildcards feature. Selecting the 'any'
value from the appropriate dropdown will not memorize that field. The same is
true when leaving the Comment field blank.
Alternatively, you may create
a Memorized Entry by going to Time-->Memorized Entries-->Create Memorized Entry (see figure 29.5).
Select a Project, Activity, Pay Type, Bill Type, and Comment.
When finished, click the Save button. The entry will be memorized and will appear
in all your timesheets.
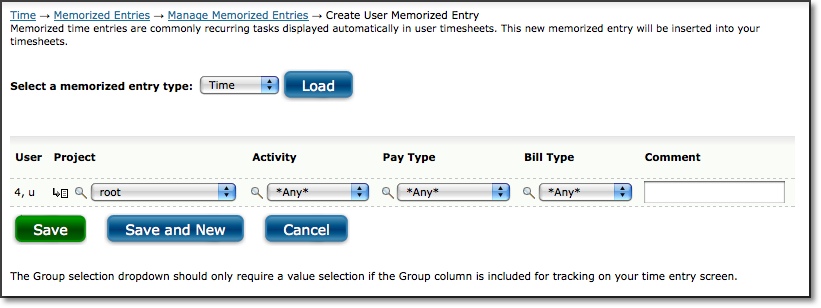
Figure 29.5. Memorized Time Entries
To
manage existing Memorized Entries, go to Time-->Memorized Entries-->Manage Memorized Entries.
This screen will show you all the Memorized Entries that you have stored in the
system. These are all the Memorized Entries that appear in your timesheets. You
can change the Project, Activity, Pay Type, Bill Type, and Comment for the respective
Memorized Entry that you want to modify. When finished, click the Save button.
To delete a Memorized Entry from your timesheet, select the Memorized Entries
to delete and click the Delete button.
Memorized Sheets
Memorized Sheets allow you to save your routine tasks
with preset hours so that you do not have to repeatedly select them when entering
time. A Memorized Sheet can contain one or more time entries. Each time entry
will contain a Project, Activity, Pay Type, Bill Type, Comment, and hours. Once a
Memorized Sheet has been created, you can load it into your timesheet when you
are logging hours. To view Memorized Sheet functionality, click the Memorized
Sheets link at the bottom of your timesheet. This will load the Manage Memorized
Sheets section (see figure 29.6).

Figure 29.6. Memorized Sheet options
Create Memorized Sheet
You can create a Memorized Sheet from within your
timesheet. Select your routine Projects, Activities, Pay Types, Bill Types, Comments,
and Hours. Once finished, specify a name for the Memorized Sheet - one that will
be easy to remember when you want to load it into your timesheet in the future.
Then check the 'apply above time records' setting and click the Memorized Sheet
button. This will direct you to the Memorized Sheet Modification screen which
will allow you to make changes to the new sheet. When you are finished editing
the sheet, click Modify to save the Memorized Sheet for future use.Loading
an Existing Memorized Sheet
If your administrator has granted you permission,
you can load an existing Memorized Sheet containing your routine tasks and hours.
When logging hours in your timesheet, simply select the Memorized Sheet that you
would like to load from the respective dropdown and click the Load button. Your
timesheet will refresh with the Memorized Sheet, which contains your routine tasks
with preset hours.Edit and Delete Memorized Sheet
To manage an
existing Memorized Sheet, select the Memorized Sheet from the selection dropdown
and click the Edit Memorized Sheet button. This will direct you to a page containing
that Memorized Sheet's routine tasks and preset hours. You may change your Project,
Activity, Pay Type, Bill Type, Comment, and Hours. Additional entries can be created
by entering time in one of the blank rows. Entries can be removed by clicking
on the Remove icon. When finished making modifications, click the Save button.To
delete a Memorized Sheet, simply select it from the dropdown and click the Delete
Memorized Sheet button.
Time In/Out
Your administrator may have configured your timesheet to
contain the Time In/Out feature. If so, this feature allows you to manually log
the time that you begin and end your work day. Alternatively, you may be able
to click on a punch clock icon that records the in and out times based on your
company's Journyx server clock. Additionally, your administrator may have also
given you the ability to log in and out multiple times in a single day. To log
the beginning of your work day, simply specify the time in the In field, including
an 'a or 'p for a.m. or p.m. of the respective date. To log out, specify the time
in the Out field of the respective date. At the bottom of the Time In/Out module,
you will see the total hours from logging in and out for your work day. Along
with entering your Time In/Out, you may have the standard timesheet features to
enter the number of hours spent on specific tasks throughout the day. At the bottom
of the standard timesheet module, you will see the total hours from entering the
time spent on specific projects. Your administrator may require that the total
Time In/Out hours equal the total time spent on specific projects for the day.
Project Entry Notes
The
system allows you to create Project Notes for any time record within a time entry.
Project Notes provide a way for you to record complex comments and information
for hours logged to a project over the course of a time period. You can create
a Project Note for a specific time record by clicking the Project Note icon ( ),
a small yellow note, located immediately to the right of a saved time record on
your timesheet. Again, the time entry must already be saved in the system before
you will see the yellow note appear. Clicking on the note will launch a pop-up
window, which can be used to create, edit, or delete Project Notes (see figure
29.7).
),
a small yellow note, located immediately to the right of a saved time record on
your timesheet. Again, the time entry must already be saved in the system before
you will see the yellow note appear. Clicking on the note will launch a pop-up
window, which can be used to create, edit, or delete Project Notes (see figure
29.7).
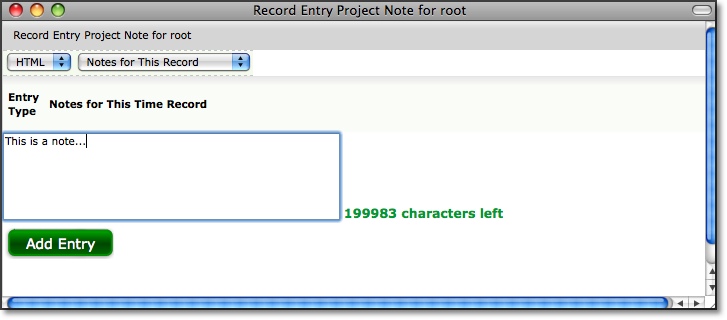
Figure 29.7. Project Notes
You can
also manage Project Notes under Preferences-->Project Notes. You
can view existing Project Notes by specifying the search criteria and date range
and then clicking the Search button. The search results of Project Notes will
be displayed below the criteria. To create a new Project Note, go to the 'Create
a New Project Note' section. Select a Project and specify a note. When finished,
click the Save button.
View Time Report
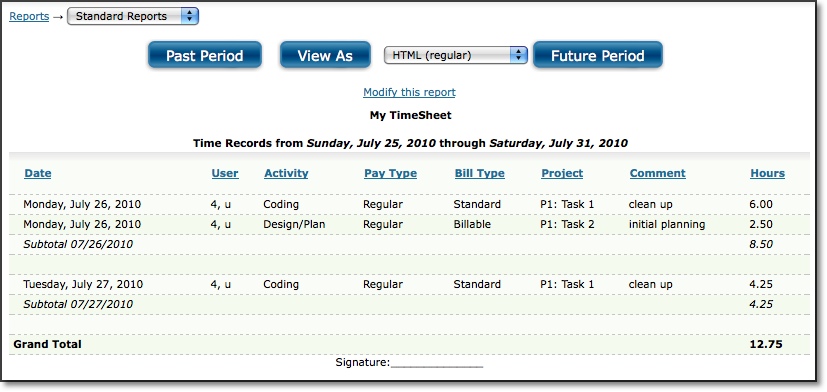
Figure
29.8. Time Report
This report displays information regarding
the time records that have been saved for this time period. The top of the report
screen includes four buttons for manipulating the Time Report. The Past Period
and Future Period buttons allow you to view reports for periods in the past or
future. The View As button allows you to see the Time Report in different formats
depending on your needs. You can view a version of this report that has been formatted
for printing. You can also view a tab-delimited file that can be saved from your
browser and imported into Excel or any other program that works with tab-delimited
files. You can also run a Cube Report and have this data export directly into
Excel. For more on this and other reports in the system, please see the Reports
section of this manual.
Sheet
History
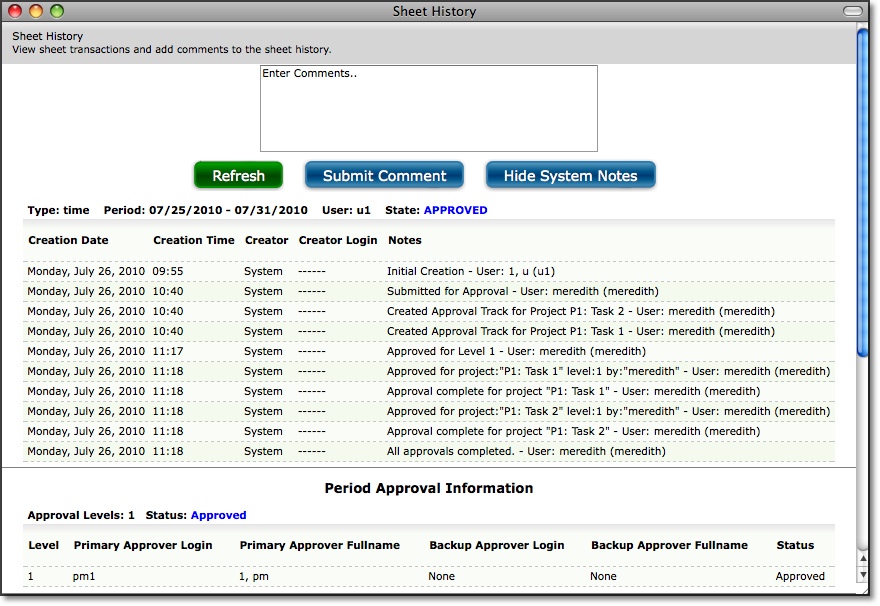
Figure 29.9. Sheet history
Sheet History
contains notes regarding the timesheet and the approval process for that specific
timesheet. The Sheet History link is located in the Additional Options section
at the bottom of your timesheet. Clicking the Sheet History link will launch a
pop-up window containing all the actions associated with the timesheet to date.
You can insert a note in the sheet history (i.e., for approvers) by specifying
the text in the available textbox and clicking the Submit Comment button. To view
more details click the Show System Notes button. This will display the system
notes that correspond to the actions associated with the timesheet. To hide the
system notes, you can click the Hide System Notes button.
Uploading File Attachments
If your administrator has enabled this feature you can attach file
uploads to your time entries. Before you can upload files you must first
create some time entries and save changes. After creating time entries
click the View/Upload File Attachments button located at the bottom of
your time sheet. This will open a pop-up window that lists your current
time entries and allows you to attach files to particular entries. Find
the entry you want to use then click "Upload File Attachment". Click the
"Choose File" button and select the attachment from your local computer
files then click "Upload File" to complete the process. You can upload
multiple attachments per time entry as long as they each have a different
filename. Your administrator may choose to limit the total number of
attachments or the type of files allowed - for example the administrator
may only allow PDF files. The administrator may also set a limit on the
size of individual files.
Accruals
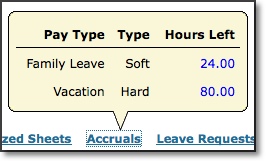
Figure 29.10. Accruals
Accruals are used to manage hour count balances for such things as
vacation, sick leave, family leave, etc. If your manager has provided
accrual balances for you, an Accruals link will be in the upper right
corner of your time entry screen. Hovering over this link will display
all the accruals that have been assigned to you along with the type of
accrual and remaining hour count balances. A soft accrual type will
allow you to exceed the hour count balance when entering time taken. A
hard accrual type will not allow you to exceed the hour count balance
allocated to you. An administrator may also create a hidden accrual
balance, which functions like a hard accrual except the current balance
will not be shown to you.
Submitting Timesheet for Approval
From your timesheet, you can click
the Submit for Approval button to submit your timesheet to your supervisor. This
button will only appear on your timesheet if your company is using Approval Plans
and if you have an approval plan assigned to you. Once a timesheet has been submitted
for approval, you may not alter any of the time records contained in that timesheet.
Therefore, do not submit your timesheet until you have finished all time entry
for the time period in question. For more information on the Approvals process,
please see the Approvals section of this manual.
Time Entry Corrections
When an entry is changed on a Time Entry screen, it can be handled in several
different ways, depending upon the System Setting for "Level of auditing required
when users make changes to existing entries." At the lowest levels of auditing,
changing an entry on the screen will actually modify the value in the database,
not preserving the original value. Each time record is stamped with a last changed
time and the ID of the user who last changed it.
At higher levels of auditing, records cannot be changed in the database. Instead,
any change that is made to a record will create a corrective record, which
records only the changes to the entry.
Corrective Entry Example
Tom logged 8 hours on Monday toward Painting. Later that day, he realized that he had
really only spent 2 hours painting and 6 hours managing. On his time entry screen, he
changes the number for Painting to a 2, and adds an entry for 6 hours for Managing. In
the database, Tom will now have 3 entries: an 8-hour entry for Painting, a -6 hour
correction for Painting (totaling 2 hours), and a 6-hour entry for Managing.
If Tom had changed the whole Painting entry to Managing, there would be a -8 hour
corrective entry in the database for Painting, effectively zeroing out the existing
entry without losing track of what had been entered before.
Administrators and users whose role includes the Corrections ability can manually
make changes to time records contained in a timesheet even if it has already been
approved, provided that corrections are allowed by the system configuration. For these
users, the Save Corrections button will appear on approved timesheets. When this button
is present, corrective entries can be manually entered in the blank rows at the bottom
of the screen.
To make corrective entries for a prior period, a user who has the Corrections role
ability should navigate to the timesheet in question and enter corrective entries as
needed. Corrective time entry allows the entry of negative records. Note that in some
systems, corrections cannot be made without a unique comment. In these cases, corrections
should be made by clicking on the time to be changed, entering a new value, and entering
a correction note to indicate the reason for the change.
Historical Timesheets
Your
past and present timesheets can be viewed under Time-->Time Sheets-->All Time Sheets
(see figure 29.11). Here you will see a list of timesheets with their relevant
periods. You can view the details of the timesheet by clicking the link labeled
'Click to View'.

Figure 29.11. Historical timesheets
Requesting Leave
Leave Requests
are dates that you have requested for time off. You can view your total pending, approved
and declined requests under Leave-->My Requests. Pending requests will show up as a red number next to the Leave menu.
Clicking through the menu will direct you to the My Leave Requests section (see figure 29.12). Here, you can view all your pending, approved and declined Leave
Requests. The value in the Accrued column is the remaining balance for the accrued pay type on the day you are viewing the leave requests. You also have the option to delete pending and approved requests that will not be used. To delete a pending or approved Leave Request, select the requests to delete and click the Delete button.
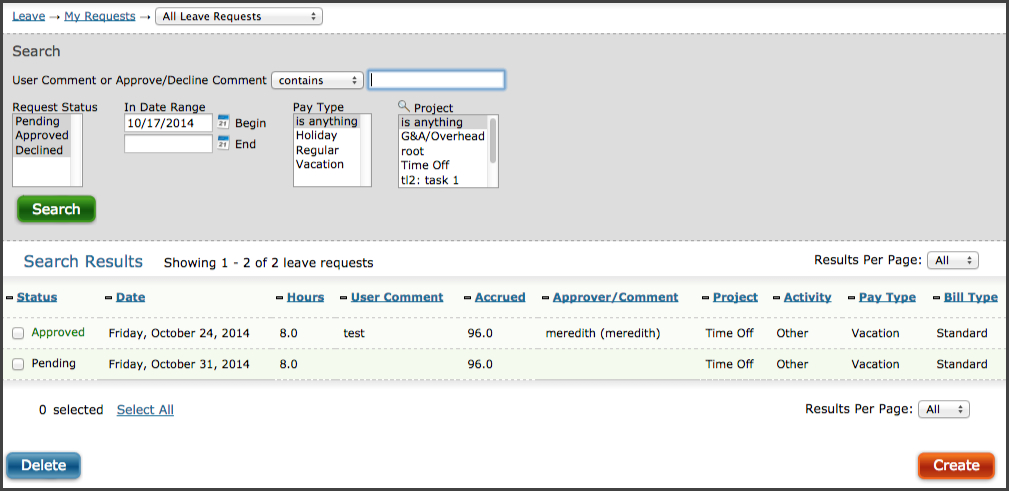
Figure 29.12. My Leave Requests
To request
time off, click the Create button. This will direct you to the Request Time Off
screen where you can specify the dates and hours per day that you wish to take
off. You can also select a Project, Activity, Pay Type, Bill Type, and Comment. The
Pay Type will contain the Accrual that you will need to select to identify the
type of Leave that you are requesting. If the new request exceeds the current accrual balance less existing leave requests, you will receive a warning when you submit the new request. Finally, you can select the persons that
you wish to notify for approval of the Leave Request. When finished, click the
Submit Request button or the Submit and Create New button if you would like to create another leave request.
You can also view your Leave Requests and request leave on a calendar under Leave-->My Calendar (see figure 29.13).Annual and monthly views show summary information, while weekly and daily views include the details of each request.
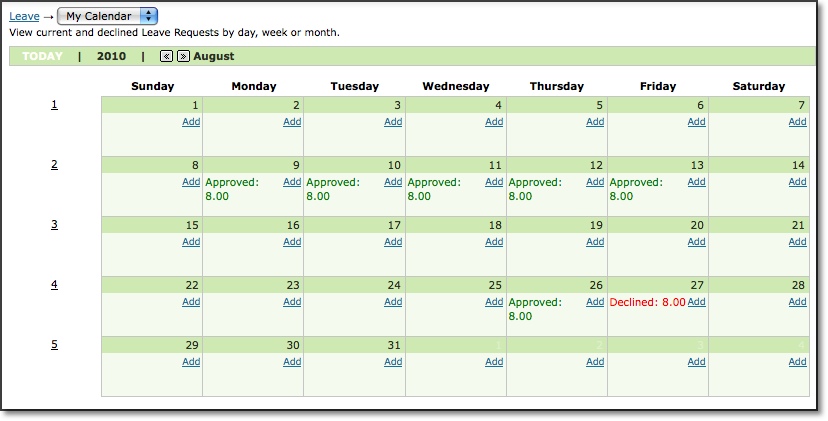
Figure 29.13. My Leave Calendar
Leave Request Management
If you have Manager or Approval Plan authority over other users in the system, you will have access to Leave Calendar and Manage Leave Requests under the Leave menu. These areas allow you to search for, view and approve/decline all leave requests for the users in your groups or approval plans. Roles with Reporter authority can view the requests for users in their groups, but they will not see options to approve or decline them.
The Leave Management Calendar includes annual and monthly views which show summary information, as well as weekly and daily views which include the details of each request. Hovering your mouse over the totals for a given day in the monthly view will display the names of the users and the amount of leave they have requested.
Stopwatch Entry
If your administrator has given you access to a Stopwatch screen, you can time your work under Time-->Stopwatch Entry
(see figure 29.14). Stopwatch is an optional timer for users who want to keep track of specific tasks as they start and stop them. The times are automatically filled in (as total hours or in/out times) on the user's standard Time Entry screen. Depending upon your screen configuration, you may need to select your details from the drop down lists before or after you've completed a task. If your screen is configured to set the details before you begin a task (on the "punch in"), you will see Pause and Resume buttons on your screen. You have the option to start timing a new task by selecting details from the drop down lists and clicking on Start/Start New or on the red button next to a Memorized Entry. When you have completed the first task, you can either Stop it or select new details and click on the Start/Start New button. This will stop the previous task and start the new one in a single step. You also have the option to Pause a task in the event of an interruption. You can then Resume the task without selecting the details again.
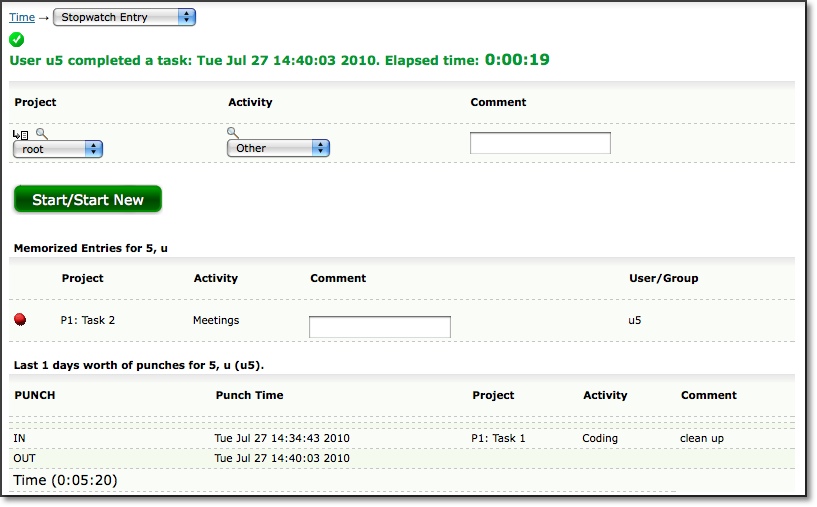
Figure 29.14. Stopwatch Entry
Stopwatch entry is optional and does not enforce the capture of in and out times. If documenting in/out times is required for your business, please use an "allocation" Time Entry screen with a punch clock or a simple Punch Entry screen.