Policies and Rules management
is located under Configuration-->Policies-->Manage Rules and Policies (see figure 3.1).
Journyx provides
a robust engine for creating and applying complex payroll and billing rules that
can be applied to time tracked by users. Policies and Rules are at the very heart
of the Rates & Rules Module of system. Administrators can create Rules that
affect how time is handled for payroll or billing purposes. These Rules are then
combined into a Policy, which can be assigned to users. Once a Policy has been
assigned, each user's time and billing is processed appropriately according to
the Rules within the Policy.
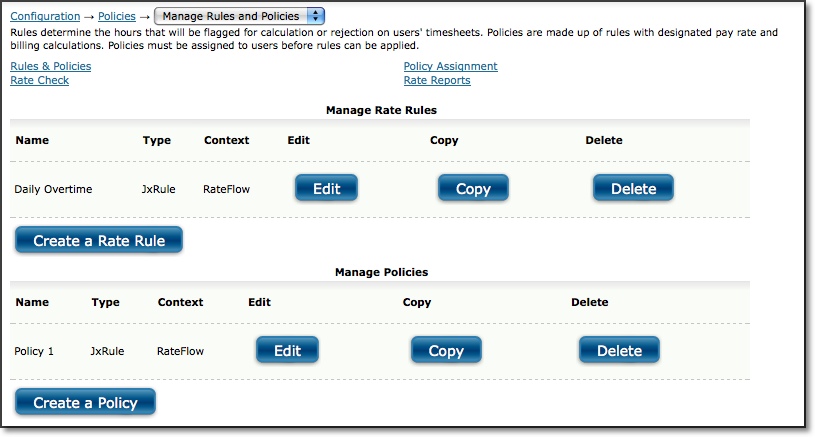
Figure 3.1. Rules and Policies main page
Policies, along with the rate rules included in those policies, require numeric values in Journyx rate fields in order to run your custom calculations. These hourly pay/cost and billing rates can be tracked in a variety of ways:
- Pay or Bill Rate per User (defined under Management-->Users)
- Pay or Bill Rate per Project (defined under Management-->Projects or Management-->Scheduled Projects for PX)
- Pay or Bill Rate per Project-Activity Combination (defined under Management-->Project-Activity Rates)
- Pay or Bill Rate per Assignment (PX only - defined under Management-->Scheduled Projects)
While you do not have to fill in all of these rate fields, you will have the option to choose both a Pay Rate origin and a Bill Rate origin for each policy. More information about selecting your rate origins is included below.
This section under Configuration contains
five main subsections: Rules, Policies, Policy Assignment, Rate Check, and Rate
Reports. In order to use this Module, the first step is to create and manage Rules.
As you are working with Rules, you must always keep in mind how the subsequent
Policies will be designed, since it will be the Policy containing the Rules which
will be directly assigned to the user. A user can only have one Policy assigned
to him/her. Journyx recommends developing a strategy for Rule and Policy creation
that focuses on the primary categories of users within your organization; that
is, a strategy that looks at how users are grouped in ways that directly affect
their time for payroll and billing purposes. An example of such a strategy would
be the creation of a Policy that relates specifically to non-exempt users, who
are subject to overtime considerations, and salaried users, who are not subject
to overtime considerations. Once the Rules have been created, you will create
a Policy that will be comprised of multiple Rules. Afterwards, you can then assign
that Policy to users. Once you have assigned the Policy, you can do a Rate Check
to see how a particular user's pay rate can be affected. Finally, Rate Reports
allow you to run a report that will display the actual Pay Rate and Bill Rates
as applied selected users' time records over a duration of time.
Rules Management
Rules can be managed under Configuration-->Policies-->Manage Rules and Policies (see figure 3.1).
On this main screen, you can view
all existing Rate Rules and Policies. Rules are used to specify particular parameters
for calculations and compliance checks that should be applied to time records
for payroll and/or billing purposes. To create a new Rule, click the Create a
Rate Rule button located under all the existing Rules. This will direct you to
the Rate Rule Creation screen (see figure 3.2).
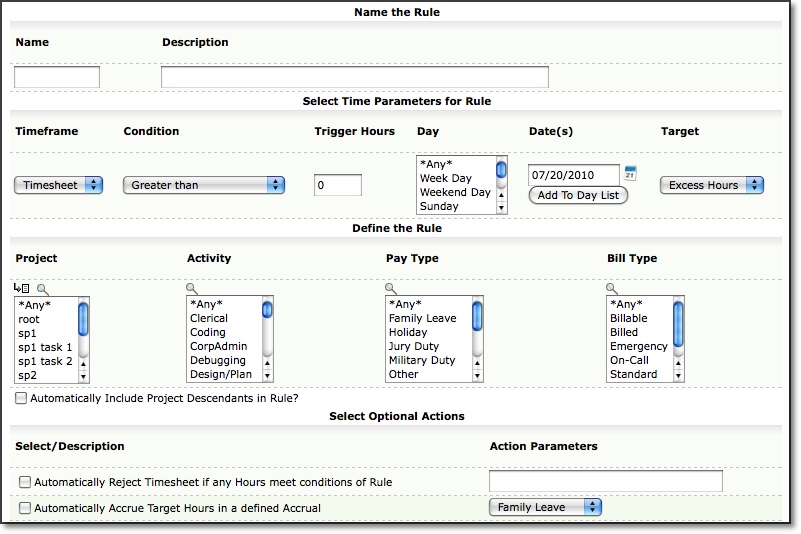
Figure 3.2. Rule creation screen
Here you
can set up all the parameters that define a Rule. The Name and Description of
a Rule are used to identify the Rule, particularly when creating Policies. Please
note that Rules, Policies and Rate Reports cannot have duplicate names. If you
attempt to name one of these items with a name already assigned to a different
item, you will receive an error message.
The Time Frame, Condition, Trigger
Hours, Day, Dates, and Target are used to define the Rule. For example, let's
say that Time Frame is 'day', Condition is 'greater than', Trigger Hours is '8',
Day is 'any', and Target is 'excess hours'. Translated, this means that the Rule
will be applied to any hours worked in excess of 8 hours for any single day. Once
you have specified the parameters of the Rule, you must select which objects the
Rule will be applied to. You can select the Projects, Activities, Pay Types, and Bill
Types for which this Rule will be applied. You may use shift-click and ctrl-click
functionality to select multiple items.
Additionally, you have Optional Actions that can be assigned to the
Rule. You can have the timesheet rejected if any hours meet the
conditions of the Rule. This is known as a Rejection Rule. You can also
have the Target hours accrue to one of the user's Accrual Types if any
hours meet the conditions of the Rule. When finished, click the Save
button. Alternatively, you may create a new Rule by clicking the
respective Copy button on the main Rule and Policy Management
screen. This will direct you to the Rule Creation screen with the
parameters and definitions pre-populated, from which point you can create
a new Rule.
To
modify an existing Rule, click the respective Edit button on the main Rule and
Policy Management screen. This will direct you to the Rule Management screen where
you can make the necessary modifications (see figure 3.1).
To delete an
existing Rule, click the respective Delete button on the main Rule and Policy
Management screen (see figure 3.1).
Policy Management
Policies can be managed under Configuration-->Policies-->Manage Rules and Policies (see figure 3.1).
On this main screen, you can view
all existing Rate Rules and Policies. A Policy is a logical grouping of Rules
that is used to apply the rules to users' hours for payroll and billing purposes.
Each Policy provides options to make rate modifications for payroll as well as
the potential for up to three unique billing rate modifications. Each user can
have only one Policy assigned to him/her. Therefore, Policies should be designed
and assigned keeping this in mind since this would affect which Rules are assigned
to a Policy.
To create a new Policy, click the Create a Policy button located
under all the existing Policies. This will direct you to the Policy Creation screen
(see figure 3.3). Here you can set up all the parameters that define a Policy.
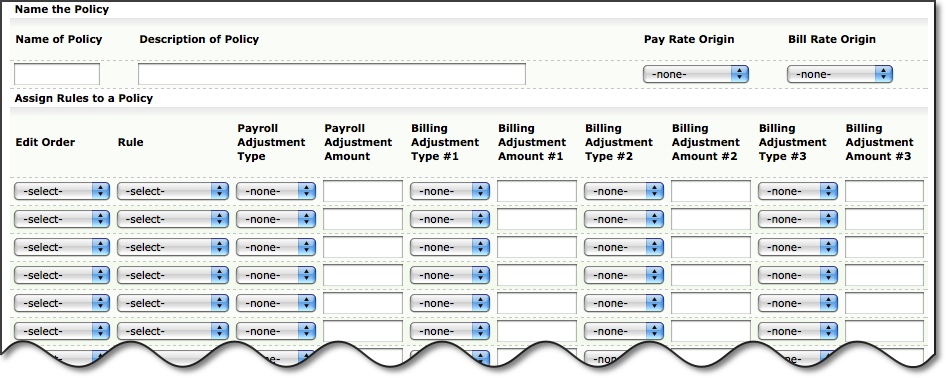
Figure 3.3. Policy creation screen
Here you can
set up all the parameters that define a Policy. The Name and Description of a
Policy are used to identify the Policy, particularly when assigning Policies to
users. The Name should be unique and help to identify the target users for the
Policy. Examples might include: hourly, salary, exempt, non-exempt, contractors
and senior staff. Please note that Rules, Policies and Rate Reports cannot have
duplicate names. If you attempt to name one of these items with a name already
assigned to a different item, you will receive an error message.
You must select a Pay Rate origin for the Policy. There are several options for choosing the source or origin of the Pay Rate. You can choose any of these options based on how you would like to associate and track your pay/costing rates in Journyx. Since a user can have his/her own
Pay Rate and the Project that the user has logged time against can have its own
Pay Rate, you must select which Pay Rate to use for the Policy. The system also
allows you some flexibility in choosing this preference. If 'user' is selected,
the system will use the Pay Rate assigned to the user whose timesheet is being
affected by each Rule. If 'project' is selected, the system will use the Pay Rate
assigned to each Project associated with the hours contained in the timesheet
that is being affected by the Rule. If 'greater' is selected, the system will
compare the Pay Rates for both the user and the Project associated with the timesheet
that is to be affected by this Policy and will use the greater of the two. If
'lesser' is selected, the system will compare the Pay Rates for both the user
and the Project associated with the timesheet that is to be affected by this Policy
and will use the lesser of the two. If 'prefer project' is selected, the system
will use the Pay Rate assigned to the Project that is associated with the hours
in the timesheet that is to be affected by this Policy. If a Pay Rate for the
Project does not exist, then the system will use the Pay Rate assigned to the
user. If 'prefer user' is selected, the system will use the Pay Rate assigned
to the user whose timesheet is to be affected by this Policy. If a Pay Rate for
the user does not exist, the system will use the Pay Rate assigned to the Project
associated with the hours contained in the timesheet.
In addition to the User and Project options for Pay Rate, you may also choose from a couple of other options. The Pay Rate origin for Project-Activity Rate allows you to use the pay rate for a project-activity combination as defined under Management-->Project-Activity Rates. When a user is assigned to a policy with the Project-Activity Rate as the Pay Rate and logs time against that project-activity combination, the associated pay rate will be applied. If you have Journyx PX, you also have the option to choose Assignment for the Pay Rate origin. In this case, the pay rate associated with a specific user/task assignment is used when the user logs time against the selected assignment. The greater, lesser and prefer options do not apply to Project-Activity and Assignment rate origins.
Similarly, you must select a Bill Rate origin for the Policy. There are several options for choosing the source or origin of the Bill Rate. You can choose any of these options based on how you would like to associate and track your billing rates in Journyx. Since a user can have his/her own
Bill Rate and the Project that the user has logged time against can have its own
Bill Rate, you must select which Bill Rate to use for the Policy. The system also
allows you some flexibility in choosing this preference. If 'user' is selected,
the system will use the Bill Rate assigned to the user whose timesheet is being
affected by each Rule. If 'project' is selected, the system will use the Bill Rate
assigned to each Project associated with the hours contained in the timesheet
that is being affected by the Rule. If 'greater' is selected, the system will
compare the Bill Rates for both the user and the Project associated with the timesheet
that is to be affected by this Policy and will use the greater of the two. If
'lesser' is selected, the system will compare the Bill Rates for both the user
and the Project associated with the timesheet that is to be affected by this Policy
and will use the lesser of the two. If 'prefer project' is selected, the system
will use the Bill Rate assigned to the Project that is associated with the hours
in the timesheet that is to be affected by this Policy. If a Bill Rate for the
Project does not exist, then the system will use the Bill Rate assigned to the
user. If 'prefer user' is selected, the system will use the Bill Rate assigned
to the user whose timesheet is to be affected by this Policy. If a Bill Rate for
the user does not exist, the system will use the Bill Rate assigned to the Project
associated with the hours contained in the timesheet.
In addition to the User and Project options for Bill Rate, you may also choose from a couple of other options. The Bill Rate origin for Project-Activity Rate allows you to use the bill rate for a project-activity combination as defined under Management-->Project-Activity Rates. When a user is assigned to a policy with the Project-Activity Rate as the Bill Rate and logs time against that project-activity combination, the associated bill rate will be applied. If you have Journyx PX, you also have the option to choose Assignment for the Bill Rate origin. In this case, the bill rate associated with a specific user/task assignment is used when the user logs time against the selected assignment. The greater, lesser and prefer options do not apply to Project-Activity and Assignment rate origins.
The next step is to
assign the Rules that will comprise the Policy. Keep in mind that these Rules
must have already been created.
When assigning Rules to a Policy, it is important
to note that Rules within a policy are executed from 'top to bottom'. In other
words, the first Rule in a Policy is applied to the hours first, the second Rule
is applied next, and so on down the list. This can be particularly important,
as the order of mathematical operations can critically affect Pay Rate and Bill
Rate amounts. Each Rule in a Policy must have at least one operation assigned
to it. In other words, every Rule must have at least a modification to one Rate.
The
Edit Order column defines which Rule will be applied first, which Rule will be
applied next, etc. From the choices in the dropdown selection, you are able to
insert, delete, move up, or move down a Rule that has been assigned to the Policy.
Once the selection is made, your entire row will be modified immediately. The
Rule column allows you to select an existing Rule to assign to the Policy. The
Rules will determine which hours should be modified for payroll and billing. The
Payroll Adjustment Type determines how the hours affected by the Rule will be
modified for payroll calculations. 'Override' replaces the hourly Pay Rate with
the new value specified in the Payroll Adjustment Amount column. 'Add' increases
the hourly Pay Rate by the amount specified in the Payroll Adjustment Amount column.
'Multiply' multiplies the hourly Pay Rate by the amount specified in the Payroll
Adjustment Amount column. The Payroll Adjustment Amount determines the amount
by which the Payroll Rate should be modified. This field accepts both positive
integers and decimal values. If you have selected a Rejection Rule, then the Payroll
Adjustment Type will automatically be set to 'reject'.
Billing Adjustment
Type #1 determines how the hours affected by the Rule will be modified for the
first Billing calculation. 'Override' replaces the hourly Billing Rate with the
new value specified in the Billing Adjustment Amount #1 column. 'Add' increases
the hourly Billing Rate by the amount specified in the Billing Adjustment Amount
#1 column. 'Multiply' multiplies the hourly Billing Rate by the amount specified
in the Billing Adjustment Amount #1 column. The Billing Adjustment Amount #1 determines
the amount by which the Billing Rate should be modified. This field accepts both
positive integers and decimal values. If you have selected a Rejection Rule, then
the Billing Adjustment Type will automatically be set to 'reject'.
Billing
Adjustment #2 and Billing Adjustment #3 are handled similarly.
Please
note that any Rule that does not directly affect a Pay or Bill rate (i.e., an
automatic rejection or an automatic accrual rule) must have an actual Adjustment
Type and Adjustment Amount associated with that rule. Journyx recommends using
either 'Add 0' or 'Multiply by 1' for these types of Rules, as both operations
will not affect the rates in question.
You can continue adding Rules
to the Policy as needed by repeating the steps above. Once all the required Rules
have been added to the Policy, click the Save button.
To modify an existing
Policy, click the respective Edit button on the main Rule and Policy Management
screen. This will direct you to the Policy Management screen where you can make
the necessary modifications (see figure 3.1).
To delete an existing Policy,
click the respective Delete button on the main Rule and Policy Management screen
(see figure 3.1).
Assigning Policies to Users
Once you have
created Rules and a Policy, the Policy should be assigned to users who will be
subject to its Rules. Each user can have only one Policy assigned to him/her.
As stated before, the most common strategy for Policy assignment is to break your
users into discreet categories based upon their employee type (full-time hourly,
exempt, salaried, contractor, etc.)
To assign a Policy to users, click
the Policy Assignment link located at the top of any of the Rates, Rules, or Policy
screens. This will direct you to a user search screen where you can specify the
search criteria for the users that you would like to assign to the Policy (see
figure 3.4).
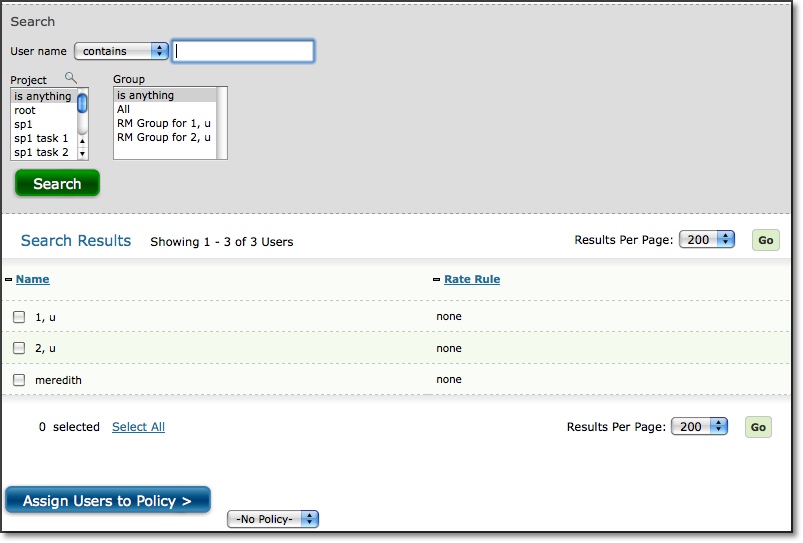
Figure 3.4. Assigning Policies to users
After
specifying the search criteria, click the Search button. The search results will
be displayed below the search criteria. Select the users to assign to the Policy
and select the appropriate Policy at the bottom of the page before clicking the
Assign Users to Policy button. You can also assign existing Policies to new users
as they are created on the User Creation page under User Management.
Rate Check
After you have created Policies and assigned them to your
users, you will want to check the final results of this process. The system provides
a simple interface for determining exactly how the Policy assigned to each user
affects the Pay and Bill rates for those users. To perform a Rate Check, click
the Rate Check link located at the top of any Rates, Rules, or Policy screen (see
figure 3.5). It is also located under Configuration-->Policies-->Rate Check.
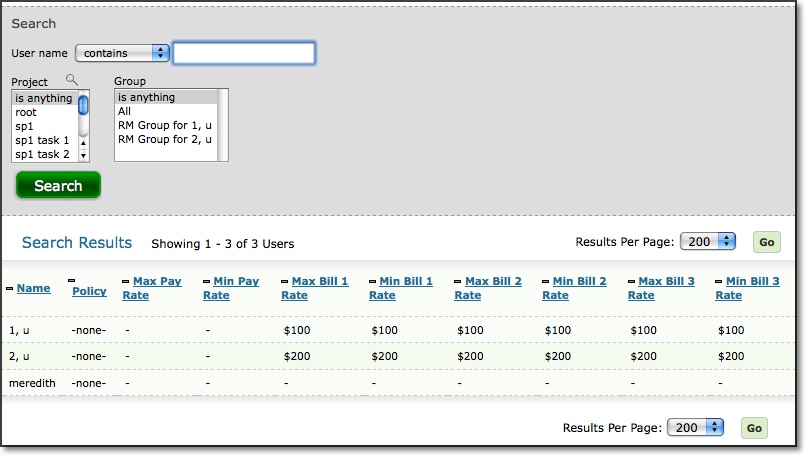
Figure 3.5. Rate Check Screen
The Rate Check
screen gives you an 'at a glance' overview of the maximum and minimum for each
user's Pay Rate as well as each of the three possible Bill Rates for those users.
You also have the ability to filter for particular users by specifying search
criteria and clicking the Search button. The search results will be displayed
under the search criteria. If a rate is shown as having a minimum of '-', check
to see if an 'hourly' Pay Rate and Bill Rate has been assigned to that user under
Management-->Users-->User Management. These settings will be located in
the Custom Fields section when managing a specific user. Without an actual 'hourly'
Rate assigned to the user(s), the system cannot effectively determine what the
minimum and maximum values are for each particular rate category.
If the
rates displayed on the Rate Check screen appear to be excessively high or low,
you may need to modify any Policies that are associated with users who are shown
to have these suspect rates. Remember, modification of rates by Policies is subject
to standard mathematical rules as well as the order in which they appear in each
Policy. The Rate Check screen indicates which Policy is assigned to each user
and provides a link to edit the Policy.
Rate Reports
Rate Reports is located under Reports-->Rate Reports.
You can also click the Rate Reports link located at the top of any Rates, Rules,
or Policy screen. Rate Reports display the pay rate, bill rate, amount paid, hours
worked and the Rule that was applied to each user's time records in the report
(see figure 3.6).
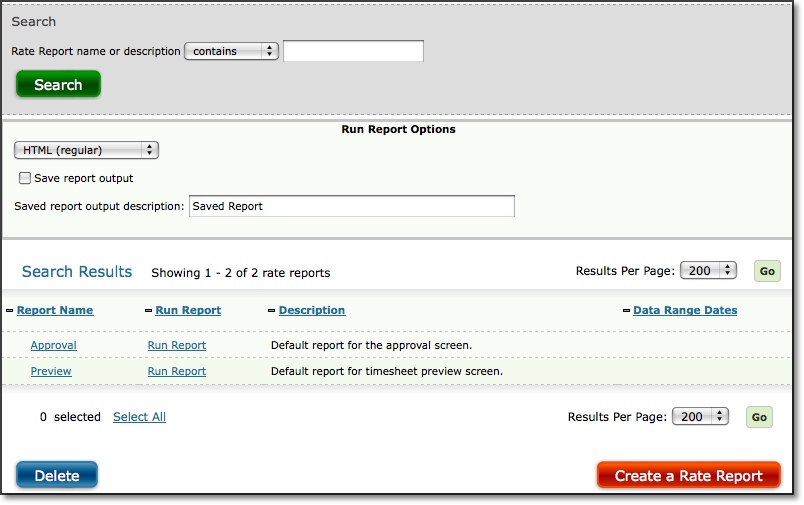
Figure 3.6. Rate Report main page
Initially,
there are two default Rate Reports named 'Approval' and 'Preview' on the main
Rate Reports screen. The 'Approval' report is directly associated with the Approvals
process and can be viewed by designated Approvers in the system when viewing a
user's timesheet. This report can be modified to affect certain aspects of the
display that Approvers see when they are viewing a submitted timesheet. However,
the date range and user selection portions of this report are locked and changing
them in the management screen will not make actual modifications to the report.
The 'Preview' report allows users to view the rate calculations applied to a given
timesheet by using the 'View Time Report' feature. The Rate Report is displayed
below the time report. As is the case with the 'Approval' report, the date range
and user selection portions cannot be changed. If you do not wish either approvers
or users to be able to view these default reports, you can change the groupings
and columns to display nothing.
To create a new Rate Report, click the Create
a Rate Report button located on the main Rate Reports screen located under Reports-->Rate
Reports. This will direct you to the Rate Report Creation screen where you can
specify the dates, filters, and options of the Rate Report (see figure 3.7).
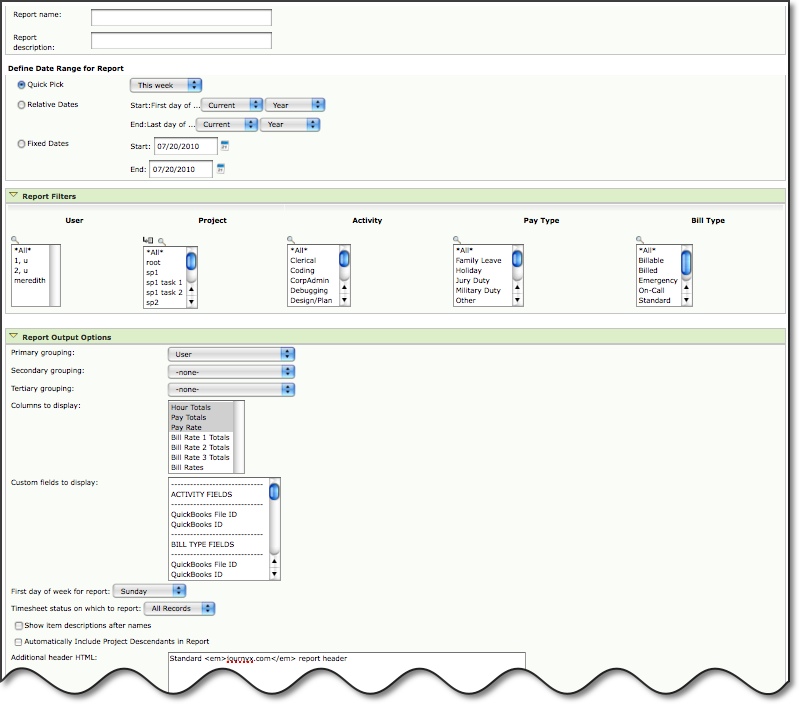
Figure 3.7. Rate Report creation screen
First,
you must specify a name and description for the Rate Report. Please note that
Rules, Policies, and Rate Reports cannot have duplicate names.
You
have three options when selecting a date range for the report: Quick Pick, Relative
Dates, and Fixed Dates. Quick Pick allows you to specify simple choices for the
date range for this report. You may select this week, last week, this month, and
last month. Relative Dates allow you to specify a date range that runs from the
first day to the last day of typical time periods such as year, quarter, month,
and week. Fixed Dates provides you the most flexibility by allowing you to enter
a specific date range.
You can additionally filter the data that is being
shown in the report in the Report Filters section. These filters allow you to
select specific Users, Projects, Activity, Pay Types, and Bill Types that you want
reported on. You can use shift-click or ctrl-click functionality to select multiple
items in the listboxes.
In the Report Output Options section, you can select
grouping mechanisms and specify display options for the data which will be shown
in the Rate Report. The grouping rules specify the method in which data should
be organized. A primary grouping must be selected, whereas the secondary and tertiary
groupings are optional. The possible groupings options are User, Project, Activity,
Pay Type, Bill Type, Year, Month, Week, Day, and Rule. Please note that no two
groupings can be set to the same selection. You can then select which columns
to display in the report. When finished setting the Rate Report, click the Save
button.
To modify the settings of an existing Rate Report, simply click
the report name on the main Rate Reports screen (see figure 3.6).
To run
a Rate Report, you can specify a name and format in the Run Report Options on
the main Rate Reports screen (see figure 3.6). Then click the respective Run Report
link.
To delete a Rate Report, select the report on the main Rate Reports
screen and click the Delete button (see figure 3.6).