Figure 1.1. Time Entry Screen main page
Entry Screens |
Help Contents |
Entry screens management is located under Configuration-->Entry Screens.
Entry screens are what users utilize when they log their time, expense, and
custom entries. Within the system, there are four types of entry screens: Time Entry
Screens, Punch Screens, Expense Entry Screens, and Custom Entry Screens. Additionally,
there is the Stopwatch Module which is an optional component for a Time Entry
Screen. Each entry screen and module is explained more thoroughly below.
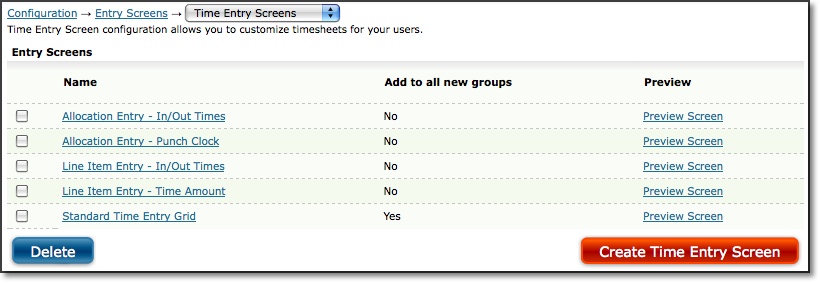
Time Entry Screens is located under Configuration-->Entry Screens-->Time
Entry Screens (see figure 1.1).
Figure 1.1. Time Entry Screen main page
Time Entry Screens are the standard entry screens that users can utilize when logging their time. These screens are highly configurable in order to suit each organization's unique time tracking process.
To create a new Time Entry Screen, click the Create Time Entry Screen button
located in the lower right corner of the main Time Entry Screen page. This will
direct you to the Time Entry Screen Creation page (see figure 1.2). Specify
the name of the Time Entry Screen. You can select one of two layout formats
for the Time Entry Screen - grid format or entry format.
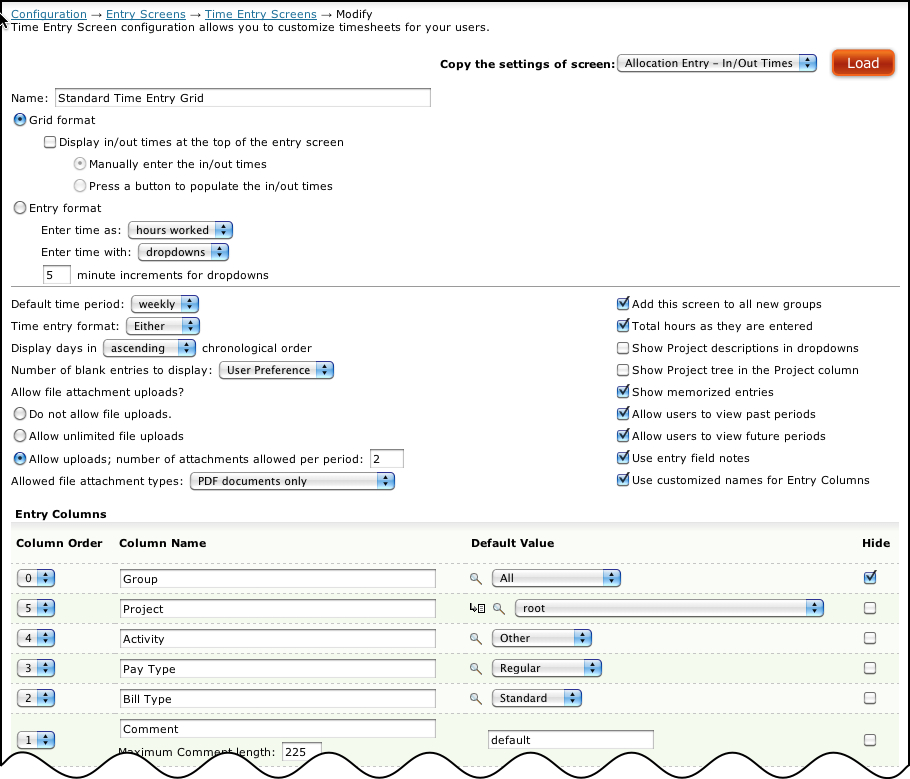
Figure 1.2. Time Entry Screen modification
Grid format presents the user with a grid of dates and spaces to enter time
for the dates that are displayed. Multiple entries for a given day are possible
in this format. The in/out time feature is an additional component that can
be displayed above the time entry table of the Time Entry Screen. Users who
have access to the in/out time feature can log the time they started work and
the time they completed tasks or are leaving for the workday. They can then
allocate these hours to individual time entries that have been logged to projects.
If you select the in/out time feature for this Time Entry Screen, you can further
select whether users will manually specify a time for when they arrived and
left work or use a clock that will automatically populate the time in the in/out
textfields.
Entry format presents users with a short list of dropdown menus that allow that user to select the parameters for a specific entry including the date of the entry. You can choose whether users will be logging total hours worked or the start and stop time for a particular task. Additionally, you can specify whether users will select hours or time worked from dropdowns or will simply specify them in a textbox. The dropdown option for time entry includes the ability to control the increments that are logged (i.e., smallest increment is 15 minutes).
Once you select the type of entry screen, you can specify the format and additional preferences for the Time Entry Screen. Time entry format allows you to set how hours will be entered into the timesheet. The 'HH:MM' setting requires that users enter their time in the 'HH:MM' format. The 'decimal' setting requires that users enter time in decimals; although, the time will be converted to HH:MM after the entries are saved. The 'either' option allows users to enter time in either 'HH:MM' or 'decimal' format. And the 'percent' option requires users to enter time in percentages that must total 100% of the workday for each day. Time entered as a percentage is converted to hours in reports based on the standard length of a day as defined under Configuration-->System Settings-->Entry Sheets.
The display dates in ascending/descending chronological order setting applies to grid entry format only and determines the order of dates from left to right when entering hours on the time entry screen for those days.
The number of blank entries to display determines how many blank rows will appear on the entry screen for new entries when the screen loads. Generally speaking, there isn't a need to have more than 1 blank row when the entry screen is loaded because new rows are automatically added when users start to fill in the 1 row that is available.
The next group of entry screen settings applies to the rules for uploading documents for specific records on this entry screen. If you choose the unlimited files upload option or specify a number allowed for the period, users will see an Upload and View File Attachments button on their entry screen that will allow them to upload up to the specific number of documents for the sheet approval period. If you do not allow file uploads, users will not see the button or have the option to upload documents to specific records. In this same group of settings, you can also select the file types that are allowed for upload: Images and PDFs, PDFs only or Images only.
There are also certain checkbox options that are related to entry screens. For example, you may not want to display long project descriptions in dropdown selection boxes as it will effect the layout of users' entry screens. Excessively long descriptions can shift other columns sometimes out of immediate sight of the user. You can also opt to display the Project tree within the dropdown selection. By clicking the Projects in the dropdown selection, you can expand and collapse the Project tree. You are also given the ability to use Entry Field Notes, which are different from Comments that can be associated to a task. Entry Field Notes allow users to apply a comment to a specific time entry for a particular day. Customized names for Entry Columns allows you to change the names of the fields/columns only on this screen, overriding the default names from System Settings.
You can also change the display order and hidden status of the column headers that will be shown to users in the Time Entry Screen. Default values can be chosen for all the column headers and a default comment may be specified. This default comment is only used as a default in the event that the column is not displayed (hidden) on a user's time entry screen. Otherwise, the default comment is derived from the user preference. The default value is used in an entry for a hidden column unless the selected project has dependency values that do not include the default. In that case, the first dependency value in alpha-numeric order will be used in the entry.
Each Entry Screen can have its own set of custom names for each Entry Field (column.) These names show up on users' Time / Expense / Custom Entry Screens, and they can also show up in Reports if the appropriate report option is set. If no custom names are set for a screen then the default names (from System Settings -> Entry Screens) are used instead. In order to set custom names you must first check the checkbox which says 'Use customized names for Entry Columns.' After this is checked you may then fill in the desired names. Be sure to click 'Save' to save the changes.
The system also allows you to attach your own custom HTML and a selection of 'tricky tags' – html-like items that pull information directly from the system database – to the header and footer of the Time Entry Screen. This feature should be reserved for administrators who are knowledgeable about code; otherwise, the custom HTML may adversely affect other sections of the Time Entry Screen. Once finished, click the Save button. You can use the Preview button to review your changes on an actual time entry screen but if you have unsaved changes be sure to click Save first, then Preview.
The available tricky tags are given below along with the system information that the 'tricky tag' will display. You must type the tag exactly as shown including capitalization.
Tricky Tag System Information Displayed <Name> Displays the login ID of the active user <Authorization> Specifically for use by the Journyx Professional Services team <Reserved> Specifically for use by the Journyx Professional Services team <Number of Input Records> Displays the number of blank rows that appear on this time entry screen for the active user; this number may be set globally for the Time Entry screen or may be left to the individual user to specify for himself <Number of Output Records> Specifically for use by the Journyx Professional Services team <Number of Dates> Displays the number of days contained in the time period upon which this time entry screen is based <Full Name> Displays the full User Name of the active user <Default Comment> Displays the default comment that the active user has defined under his preferences tab <Other Options> This tag is specifically for use by the Journyx Professional Services team <Expense Entry GUI in Use> Displays the name of the Expense Entry screen assigned to the active user <Time Entry GUI in Use> Displays the name of the Time Entry screen assigned to the active user <Domain ID> Displays the name of the Domain that contains the active user <Mileage Entry GUI in Use> Displays the name of the Custom Entry screen assigned to the active user <Custom Field Name> Displays the name of the contents of the named User Custom Field. For instance, if you want to show the contents of the user's custom field "Employee Number" then use the tag <Employee Number>. Likewise, in order to use the "Email Address" field you can use the tag <Email Address>. Please note that if you have renamed any of the default custom fields such as renaming "Email Address" to "E-mail" then you must use the renamed field name in the tag. If the user does not have a value set for that Custom Field then the tag will be replaced with a blank value. Any custom field with the same name as one of the standard tags mentioned above will be ignored. Any custom fields with Visibility set to Hidden will not show up. The user must also be assigned a role that is allowed to report on the custom field.
Alternatively, you may also create a new Time Entry Screen by copying the attributes of an existing Time Entry Screen at the top right corner of the screen (see figure 1.2). Once copied, you then only have to change the attributes that will be unique to the new Time Entry Screen.
To modify an existing Time Entry Screen, simply click the name of the Time Entry Screen from the main Time Entry Screen page located under Configuration-->Entry Screens-->Time Entry Screens (see figure 1.1).
To delete a Time Entry Screen, check the entry screens to delete and click the Delete button (see figure 1.1).
Punch Entry Screens is located under Configuration-->Entry Screens-->Punch
Entry Screens (see figure 1.3).

Figure 1.3. Punch Entry Screens main page
Punch Entry Screens are time entry screens that are ideal for non-exempt employees
who will typically be using a single terminal to punch-in at the beginning of
the workday and punch-out at the end of the workday. In this manner, the Punch
Entry Screen simulates the old timed punch clock. The Punch Entry Screen is
not complex and is not designed for user flexibility, but rather ease of use.
To create a new Punch Entry Screen, click the Create Punch Screen button located
in the lower right corner of the main Punch Entry Screen page. This will direct
you to the Punch Screen Creation page where you can specify the attributes of
the Punch Entry Screen (see figure 1.4). Specify a name for the Punch Entry
Screen. You can then specify to what extent you wish to show to users' their
recent punches. You can also select which additional options will be allowed
to the users such as the Timecard Report button or the Accruals button.
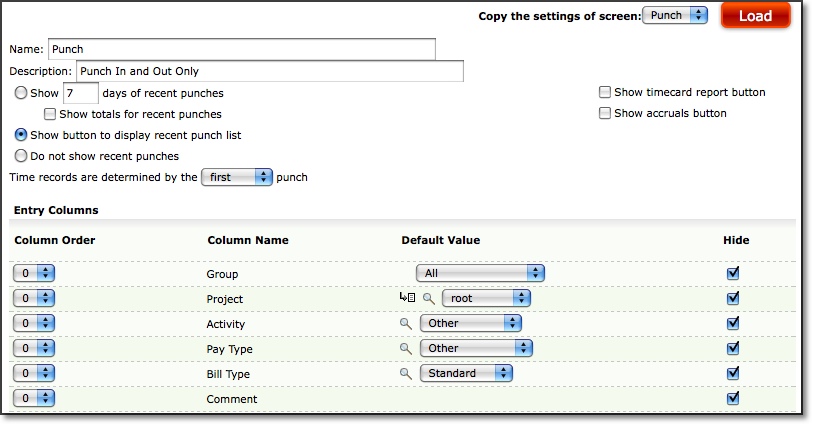
Figure 1.4. Punch Entry Screen modification
You may also change the display order and hidden status of the column headers that will be shown to users in the Punch Entry Screen. Default values can be chosen for all the column headers and a default comment may be specified. Punch users by default do not have access to any tabs, so they will not be able to override anything.
Alternatively, you may also create a new Punch Entry Screen by copying the attributes of an existing Punch Entry Screen at the top right corner of the screen. Once copied, you then only have to change the attributes that will be unique to the new Punch Screen.
To modify an existing Punch Entry Screen, simply click the name of the Punch Entry Screen from the main Punch Entry Screen page located under Configuration-->Entry Screens-->Punch Entry Screens (see figure 1.3).
To delete a Punch Entry Screen, check the entry screens to delete and click the Delete button (see figure 1.3).
Stopwatch Modules is located under Configuration-->Entry Screens-->Stopwatch
Modules (see figure 1.5).
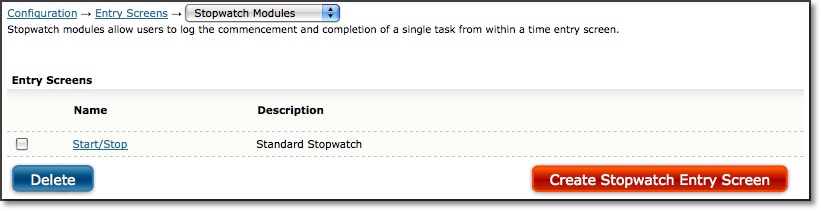
Figure 1.5. Stopwatch Modules main page
Stopwatch Modules is an additional component that can be used in conjunction
with a standard Time Entry Screen. It allows users via a stopwatch to log the
start and stop of a time entry that can contain a Project, Activity, Pay Type, Bill
Type, and Comment. This is simply a more accurate way of measuring users' time
spent on tasks.
To create a new Stopwatch Module, click the Create Stopwatch Module button
located in the lower right corner of the main Stopwatch Module page. This will
direct you to the Stopwatch Module Creation page where you can specify the attributes
of the Stopwatch Module (see figure 1.6). Specify a name for the Stopwatch Module.
You can then specify to what extent you wish to show users' their recent punches
on the stopwatch screen. You can also select which additional options will be
displayed on the stopwatch screen such as Memorized Entries, Timecard Report
button, and the Accruals button.
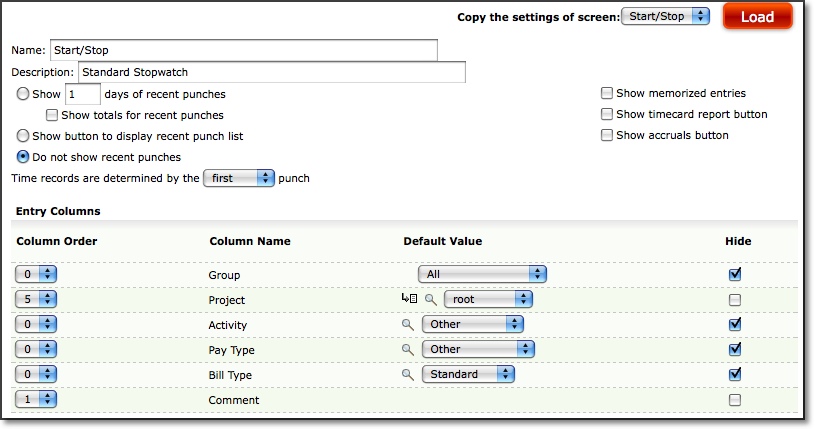
Figure 1.6. Stopwatch Module modification
You can also change the display order and hidden status of the column headers that will be shown to users in the Stopwatch Module. Default values can be chosen for all the column headers and a default comment may be specified.
Alternatively, you may also create a new Stopwatch Module by copying the attributes of an existing Stopwatch Module at the top right corner of the screen. Once copied, you then only have to change the attributes that will be unique to the new Stopwatch Module.
To modify an existing Stopwatch Module, simply click the name of the Stopwatch Module from the main Stopwatch Module page located under Configuration-->Entry Screens-->Stopwatch Modules (see figure 1.5).
To delete a Stopwatch Module, check the Stopwatch Modules to delete and click the Delete button (see figure 1.5).
Expense Entry Screens is located under Configuration-->Entry Screens-->Expense
Entry Screens (see figure 1.7).
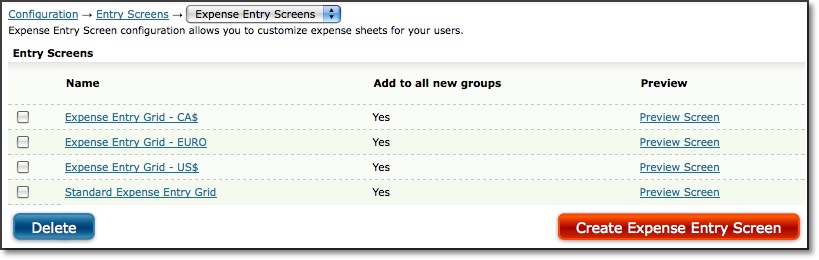
Figure 1.7. Expense Entry Screens main page
Expense Entry Screens are the standard entry screens that users can utilize
when logging their business related expenses. These screens are highly configurable
in order to suit each organization's unique expense tracking process.
To create a new Expense Entry Screen, click the Create Expense Entry Screen
button located in the lower right corner of the main Expense Entry Screen page.
This will direct you to the Expense Entry Screen Creation page. Specify the
name of the Expense Entry Screen (see figure 1.8).
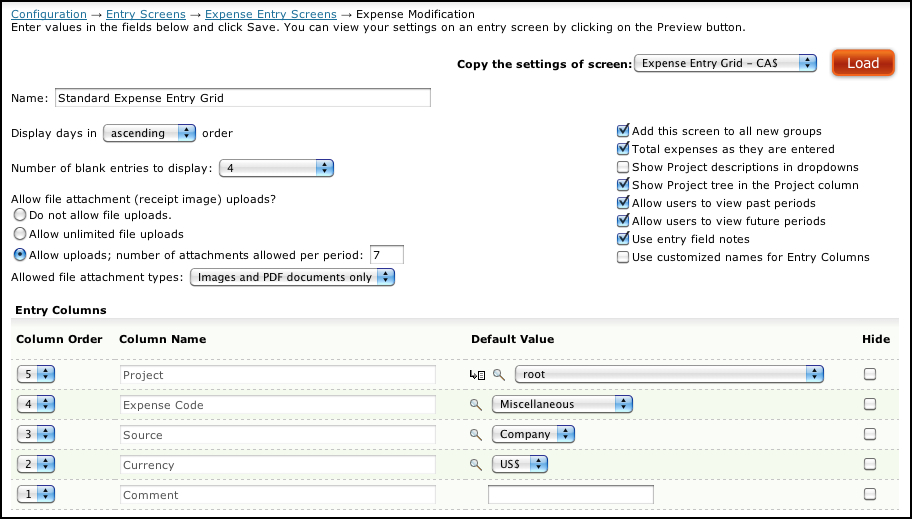
Figure 1.8. Expense Entry Screen modification
Once you specified a name, you can select the options for the Expense Entry Screen. You can also change the display order and hidden status of the column headers that will be shown to users in the Expense Entry Screen.
The number of blank entries to display determines how many blank rows will appear on the entry screen for new entries when the screen loads. Generally speaking, there isn't a need to have more than 1 blank row when the entry screen is loaded because new rows are automatically added when users start to fill in the 1 row that is available.
The next group of entry screen settings applies to the rules for uploading documents for specific records on this entry screen. If you choose the unlimited files upload option or specify a number allowed for the period, users will see an Upload and View File Attachments button on their entry screen that will allow them to upload up to the specific number of documents for the sheet approval period. If you do not allow file uploads, users will not see the button or have the option to upload documents to specific records. In this same group of settings, you can also select the file types that are allowed for upload: Images and PDFs, PDFs only or Images only.
There are also certain checkbox options that are related to entry screens. For example, you may not want to display long project descriptions in dropdown selection boxes as it will effect the layout of users' entry screens. Excessively long descriptions can shift other columns sometimes out of immediate sight of the user. You can also opt to display the Project tree within the dropdown selection. By clicking the Projects in the dropdown selection, you can expand and collapse the Project tree. You are also given the ability to use Entry Field Notes, which are different from Comments that can be associated to a task. Entry Field Notes allow users to apply a comment to a specific expense entry for a particular day.
Default values can be chosen for all the column headers and a default comment may be specified. This default comment is only used as a default in the event that the column is not displayed (hidden) on a user's expense entry screen. Otherwise, the default comment is derived from the user preference. The default value is used in an entry for a hidden column unless the selected project has dependency values that do not include the default. In that case, the first dependency value in alpha-numeric order will be used in the entry.
The system also allows you to attach your own custom HTML and a selection of 'tricky tags' – html-like items that pull information directly from the system database – to the header and footer of the Expense Entry Screen. This feature should be reserved for administrators who are knowledgeable about code; otherwise, the custom HTML may adversely affect other sections of the Expense Entry Screen.
The available tricky tags are given below along with the system information that the 'tricky tag' will display. You must type the tag exactly as shown including capitalization.
Tricky Tag System Information Displayed <Name> Displays the login ID of the active user <Authorization> Specifically for use by the Journyx Professional Services team <Reserved> Specifically for use by the Journyx Professional Services team <Number of Input Records> Displays the number of blank rows that appear on this time entry screen for the active user; this number may be set globally for the Time Entry screen or may be left to the individual user to specify for himself <Number of Output Records> Specifically for use by the Journyx Professional Services team <Number of Dates> Displays the number of days contained in the time period upon which this time entry screen is based <Full Name> Displays the full User Name of the active user <Default Comment> Displays the default comment that the active user has defined under his preferences tab <Other Options> This tag is specifically for use by the Journyx Professional Services team <Expense Entry GUI in Use> Displays the name of the Expense Entry screen assigned to the active user <Time Entry GUI in Use> Displays the name of the Time Entry screen assigned to the active user <Domain ID> Displays the name of the Domain that contains the active user <Mileage Entry GUI in Use> Displays the name of the Custom Entry screen assigned to the active user <Custom Field Name> Displays the name of the contents of the named User Custom Field. For instance, if you want to show the contents of the user's custom field "Employee Number" then use the tag <Employee Number>. Likewise, in order to use the "Email Address" field you can use the tag <Email Address>. Please note that if you have renamed any of the default custom fields such as renaming "Email Address" to "E-mail" then you must use the renamed field name in the tag. If the user does not have a value set for that Custom Field then the tag will be replaced with a blank value. Any custom field with the same name as one of the standard tags mentioned above will be ignored. Any custom fields with Visibility set to Hidden will not show up. The user must also be assigned a role that is allowed to report on the custom field.
Once finished, click the Save button. You can also use the Preview button to review your changes on an actual Expense Entry Screen.
Alternatively, you may also create a new Expense Entry Screen by copying the attributes of an existing Expense Entry Screen at the top right corner of the screen. Once copied, you then only have to change the attributes that will be unique to the new Expense Entry Screen.
To modify an existing Expense Entry Screen, simply click the name of the Expense Entry Screen from the main Expense Entry Screen page located under Configuration-->Entry Screens-->Expense Entry Screens (see figure 1.7).
To delete an Expense Entry Screen, check the entry screens to delete and click the Delete button (see figure 1.7).
Custom Entry Screens is located under Configuration-->Entry Screens-->Custom
Entry Screens (see figure 1.9).
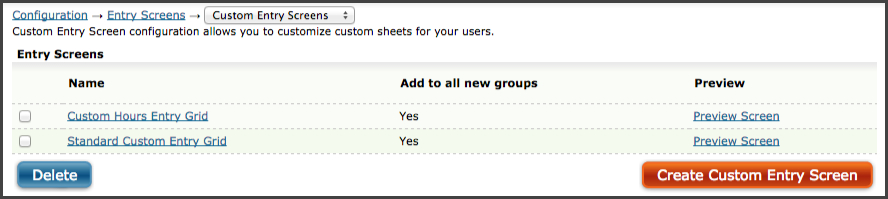
Figure 1.9. Custom Entry Screens main page
Custom Entry Screens are the standard entry screens that users can utilize
when logging their business related travel. These screens are highly configurable
in order to suit each organization's unique custom entry tracking process.
To create a new Custom Entry Screen, click the Create Custom Entry Screen
button located in the lower right corner of the main Custom Entry Screen page.
This will direct you to the Custom Entry Screen Creation page (see figure 1.10).
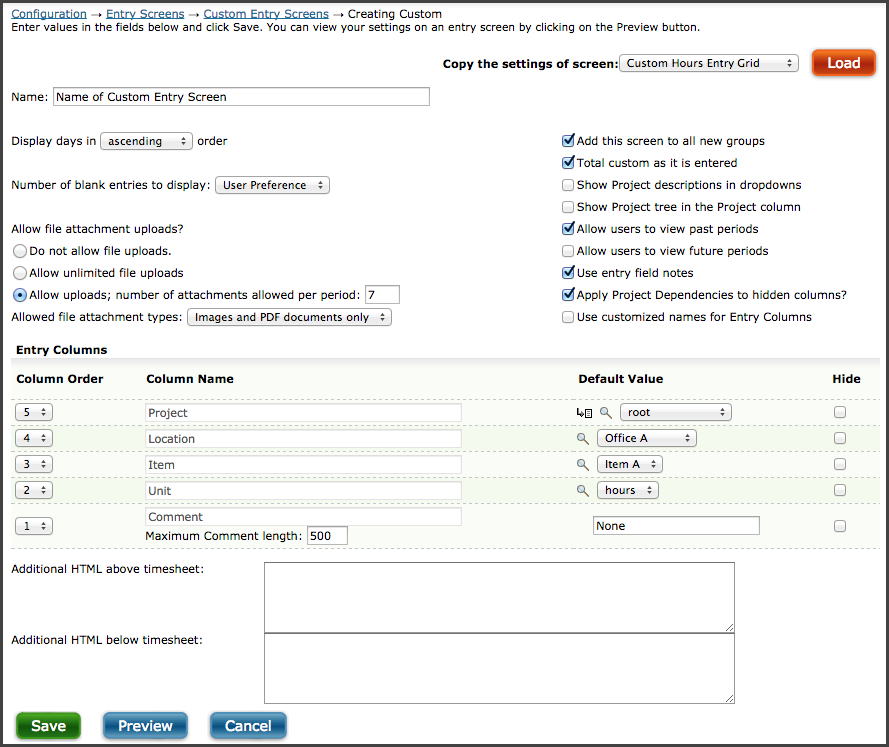
Figure 1.10. Custom Entry Screen modification
Specify the name of the Custom Entry Screen. Once you specified a name, you can select the options for the Custom Entry Screen. You can also change the display order and hidden status of the column headers that will be shown to users in the Custom Entry Screen.
The number of blank entries to display determines how many blank rows will appear on the entry screen for new entries when the screen loads. Generally speaking, there isn't a need to have more than 1 blank row when the entry screen is loaded because new rows are automatically added when users start to fill in the 1 row that is available.
The next group of entry screen settings applies to the rules for uploading documents for specific records on this entry screen. If you choose the unlimited files upload option or specify a number allowed for the period, users will see an Upload and View File Attachments button on their entry screen that will allow them to upload up to the specific number of documents for the sheet approval period. If you do not allow file uploads, users will not see the button or have the option to upload documents to specific records. In this same group of settings, you can also select the file types that are allowed for upload: Images and PDFs, PDFs only or Images only.
There are also certain checkbox options that are related to entry screens. For example, you may not want to display long project descriptions in dropdown selection boxes as it will effect the layout of users' entry screesn. Excessively long descriptions can shift other columns sometimes out of immediate sight of the user. You can also opt to display the Project tree within the dropdown selection. By clicking the Projects in the dropdown selection, you can expand and collapse the Project tree. You are also given the ability to use Entry Field Notes, which are different from Comments that can be associated to a task. Entry Field Notes allow users to apply a comment to a specific custom entry for a particular day.
Default values can be chosen for all the column headers and a default comment may be specified. This default comment is only used as a default in the event that the column is not displayed (hidden) on a user's custom entry screen. Otherwise, the default comment is derived from the user preference. The default value is used in an entry for a hidden column unless the selected project has dependency values that do not include the default. In that case, the first dependency value in alpha-numeric order will be used in the entry.
The system also allows you to attach your own custom HTML and a selection of 'tricky tags' – html-like items that pull information directly from the system database – to the header and footer of the Custom Entry Screen. This feature should be reserved for administrators who are knowledgeable about code; otherwise, the custom HTML may adversely affect other sections of the Custom Entry Screen.
The available tricky tags are given below along with the system information that the 'tricky tag' will display. You must type the tag exactly as shown including capitalization.
Tricky Tag System Information Displayed <Name> Displays the login ID of the active user <Authorization> Specifically for use by the Journyx Professional Services team <Reserved> Specifically for use by the Journyx Professional Services team <Number of Input Records> Displays the number of blank rows that appear on this time entry screen for the active user; this number may be set globally for the Time Entry screen or may be left to the individual user to specify for himself <Number of Output Records> Specifically for use by the Journyx Professional Services team <Number of Dates> Displays the number of days contained in the time period upon which this time entry screen is based <Full Name> Displays the full User Name of the active user <Default Comment> Displays the default comment that the active user has defined under his preferences tab <Other Options> This tag is specifically for use by the Journyx Professional Services team <Expense Entry GUI in Use> Displays the name of the Expense Entry screen assigned to the active user <Time Entry GUI in Use> Displays the name of the Time Entry screen assigned to the active user <Domain ID> Displays the name of the Domain that contains the active user <Mileage Entry GUI in Use> Displays the name of the Custom Entry screen assigned to the active user <Custom Field Name> Displays the name of the contents of the named User Custom Field. For instance, if you want to show the contents of the user's custom field "Employee Number" then use the tag <Employee Number>. Likewise, in order to use the "Email Address" field you can use the tag <Email Address>. Please note that if you have renamed any of the default custom fields such as renaming "Email Address" to "E-mail" then you must use the renamed field name in the tag. If the user does not have a value set for that Custom Field then the tag will be replaced with a blank value. Any custom field with the same name as one of the standard tags mentioned above will be ignored. Any custom fields with Visibility set to Hidden will not show up. The user must also be assigned a role that is allowed to report on the custom field.
Once finished, click the Save button. You can use the Preview button to review your changes on an actual Custom Entry Screen.
Alternatively, you may also create a new Custom Entry Screen by copying the attributes of an existing Custom Entry Screen at the top right corner of the screen. Once copied, you then only have to change the attributes that will be unique to the new Custom Entry Screen.
To modify an existing Expense Entry Screen, simply click the name of the Custom Entry Screen from the main Custom Entry Screen page located under Configuration-->Entry Screens-->Custom Entry Screens (see figure 1.9).
To delete a Custom Entry Screen, check the entry screens to delete and click the Delete button (see figure 1.9).